Must construct a DC Motor in your HSC Physics Sensible? Frightened that your motor might be all powered up with nowhere to spin? Nicely, don’t fear! On this submit, Physics guru Tom Dixon will present you construct a DC motor. That can assist you get your motor working, we’ve written up a step-by-step information so you can also make certain your experiment is all torque and never simply all speak!
On this video, I clarify construct your DC Motor. For this sensible evaluation, you’ll first must get the next objects:
- Some aluminium foil
- A coil of copper wire – to be protected you need a minimum of a metre
- 2 inflexible copper wires – these should be lengthy sufficient to succeed in the commutator and in addition contact the bottom
- 4 screws – These are used to suit your angle brackets
- 2 Washers
- 2 Electrically conductive screws – These should be electrically conductive so you may wrap your wires round them while you join the motor
- 2 washers
- Some fasteners – To carry your inflexible wires in place
- An influence pack
- A sturdy piece of wooden – This must be a minimum of double the size and width of your motor. Your motor must comfortably match atop this.
- A chunk of styrofoam – Your styrofoam must be extensive, however not lengthy; you need to have a brief/thick styrofoam and coil system. For the video, I minimize items from a styrofoam ball till it was the suitable form and dimension
- A set of robust magnets
- A chunk of sandpaper
- 4 angle brackets ( 2 common and 2 slotted) – The slotted brackets should be capable of suit your rotor into them (i,e the slot dimension ought to match a sharpened pencil, however it shouldn’t be capable of go all over). Additionally they should be excessive sufficient that your styrofoam doesn’t hit the bottom when the unit spins. The common angle brackets should be as excessive because the slotted brackets so the magnets caught to them are as excessive because the rotor coil.
- 1 pencil, sharpened on each side
- 1 screwdriver (ensure you have a phillips head screwdriver in case your use screws with a X-head)
- A multimeter
- Scissors
- Sticky tape
Need to ace your subsequent Physics Sensible Evaluation?
Obtain the Matrix Sensible Expertise Workbook and sharpen your Physics expertise. Learn to:
- Assess the validity, reliability and accuracy of any measurements and calculations
- Decide the sources of systematic and random errors
- Establish and apply applicable mathematical formulae and ideas
- Draw applicable graphs to convey relationships

The elements and tools you’ll need.
When you’ve acquired this collectively, your able to construct your motor.
Let me present you ways:
Video: How one can Construct a DC Motor
How one can Construct a DC Motor from Matrix Schooling on Vimeo.
How one can construct a DC motor step-by-step
In case you need to comply with a step-by-step information, we’ve included the steps for constructing the motor under.
Step 1: Construct your coil base.
First, you’ll want to construct your coil base.
To do that, insert your pencil by the styrofoam. You need to ensure that the froth sits a couple of quarter of the best way alongside the pencil.

Solely put the pencil a couple of quarter means by the Styrofoam.
You’re now prepared to decorate it with the copper coil.
Step 2: Wrap the coil across the coil base
First, you need to strip the tip of the wire so it conducts electrical energy successfully. To do that sand down the ends utilizing the sandpaper.
Then, wrap the copper wire across the base. When wrapping the styrofoam, I want to wrap one facet after which the opposite. You need to ensure that each side are evenly wrapped.
Keep in mind, the extra turns of the wire, the extra torque your motor will generate!

Step 3: Check {the electrical} connection of the wire
Now you’ve wrapped the bottom, take a look at the wires together with your multimeter set to ‘beep’ mode (that is additionally known as ‘continuity’ mode).
To do a “beep-test,’ contact every lead of the multimeter (ensuring it’s in ‘beep’ mode) to a special finish of the coil – do you hear a beep?
Should you don’t hear a beep, your connections aren’t working. It’s essential sand the ends down additional. Use the sandpaper to essentially tough up the ends of the wires.
Check the wires after additional sanding. In the event that they nonetheless don’t conduct, put on them again till they do.
Step 4: Enhance {the electrical} connections of the coil base
Minimize two strips of aluminium foil about 1.5 cm extensive and lengthy sufficient to wrap across the wire ideas a number of occasions.
Wrap the ends with the foil. Be sure you wrap the foil tightly across the finish. You should use sticky tape to safe it, however you could make sure that you solely use a skinny piece and don’t intervene with {the electrical} connection.

Watch out together with your sticky tape placement
Step 5: Verify the connections
Now we’ve constructed the bottom, we have to double test the connections to ensure they conduct.
Seize your multimeter and conduct one other beep take a look at to make sure the wire is conducting.
Do you hear a beep? Sure. Then you definitely’re able to construct your commutator.
Step 6: Make the commutator
For this, you’ll want two items of aluminium foil to wrap the styrofoam and copper coil. You’ll must make two half-circles of foil that run alongside the size of your axle. Stick these down on high of the wire-ends. You’ll then sticky tape this to the facet of the pencil.
You need to align the commutator and coil appropriately.
Keep in mind: When the coil is horizontal within the most torque place your commutator must be in electircal contact.
You need the 2 electrical contacts to be at contact when the torque is at most.
Equally, when the coil (and that is the coil, not the styrofoam) is vertical you need the gaps within the commutator horizontal.
Be sure you set the coil appropriately. When the coil is horizontal, you need the commutator to be horizontal.
Observe this course of to construct the commutator:
- Strap the wires to the pencil with tape near the coil. Be sure you place every wire beneath the place the commutator part will go. The wires must be caught down in order that they’re on the 2 reverse horizontal sides of the axle when the coil is horizontal.
- Fold the primary foil strip the right width and wrap it round one facet of the pencil
- Tape it to the highest and backside of the pencil to carry it in place
- Fold the opposite piece of foil and wrap it across the different facet of the pencil.
- Tape that in place, too
You need to now have a pencil that’s wrapped with two strips of foil and a skinny hole between them working from tip to styrofoam. See the screenshot under in the event you’re not sure.

The hole is what allows the motor to generate steady torque in the identical path.
Step 7: Assemble the stator (the bottom)
The stator is the bottom if the motor. Stator is a phrase derived from “stationary” and “rotor” on the sample of “rotor.”
Your stator wants to carry your rotor in place whereas it spins.
You’ll want to make use of your angled brackets with slots for the axial path of the motor (ie, the lengthy facet and never the extensive facet of the wooden).
- Measure the pencil and mark the wooden on the applicable distance.
- Then, screw within the slotted angle bracket with screws and washer. Depart them a bit unfastened so you may safe your pencil rotor.
- Subsequent, screw within the common angle brackets on the perimeters of the board within the center.
- Insert the pencil into the slotted brackets
- Alter the bracket positioning so the pencil is secured however can rotate
- Tighten the slotted bracket so it’s securely in place
Now you’ve constructed the stator, you’re prepared to connect the wires for the present.
Step 8: Connect the wires for the facility provide
Now you’ve acquired the rotor and stator in your DC motor, you’ll want to get it powered up. Like Iron Man with out his arc reactor, your motor gained’t do a lot until it’s powered up.
- First, you want must affix the 2 electrically conductive screws on the commutator finish of your stator
- Subsequent, you’ll want to trim the ends of your stiff wire and guarantee they’re clear
- Wrap one finish of the every of the trimmed wires round every screw
- Bend the wire so it makes the comb contact with the commutator
- Affix the wire with a clip or tape to make sure it doesn’t transfer when the rotor spins. You don’t need the torque from the rotation to shake the contact unfastened.
Now your motor is wired, it’s prepared for its closing checks.
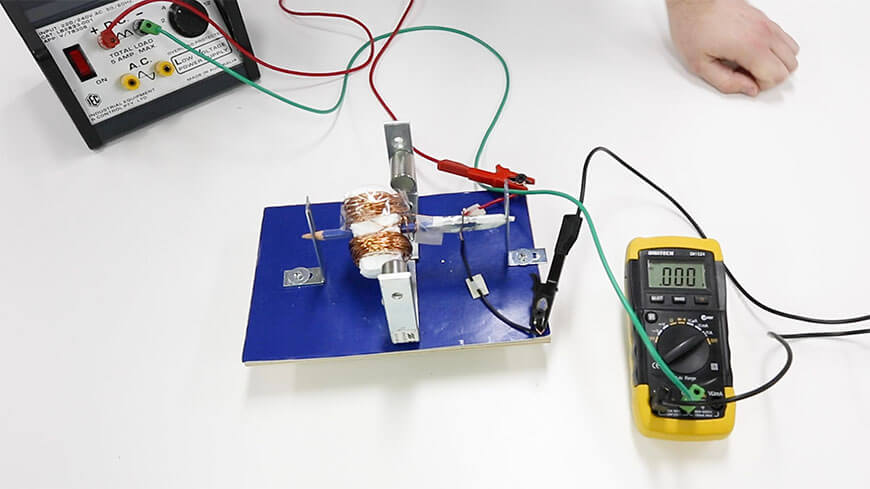
Step 9: Beep-test the connections
Take the multimeter and beep take a look at the connections to ensure they operate.
Double test the commutator and the connection from the screws to the stiff electrical wire.
Step 10: Get your motor working
Now you’ve constructed the rotator and stator and put them collectively, you’re able to get issues rolling.
First, affix the magnets to the common angled brackets.
Just be sure you have sufficient room between the magnets in your rotor to spin!
Subsequent, join your energy provide’s alligator clips to the conductive screws.
Flip the facility on. Don’t be disenchanted if it doesn’t kick off by itself; the coil is heavy.
In case your motor doesn’t spin by itself – it could simply rock a bit – you’ll want to give it a bit nudge to get it ticking over.
Congratulations, you’ve simply constructed your first DC motor!